LORD Corporation
With more than 3,100 employees in 26 countries, 19 manufacturing facilities and 10 R&D centers worldwide, we're there for our customers.
Our Company
-
Products and Solutions
To speak to someone directly, call
Customer Support:
8AM–5PM EST
Technical Support:
8AM–5PM EST
-
Industries
To speak to someone directly, call
Customer Support:
8AM–5PM EST
Technical Support:
8AM–5PM EST
-
Our Company
To speak to someone directly, call
Customer Support:
8AM–5PM EST
Technical Support:
8AM–5PM EST
-
Feedback Button
Feedback Button
Sometimes referred to as "glue," an adhesive is a substance used to bond together two surfaces and is generally sticky in texture. Structural adhesives are engineered to form bonds that can support loads (via load-bearing joints) and are formulated to improve manufacturing processes and final products for a variety of composite, metal and plastic assemblies. To learn more about how adhesives work, advantages of using structural adhesives, types of structural adhesives (acrylic, epoxy and urethane) and best practices for the application and testing of structural adhesives, please read the sections below.
Basics of Adhesion
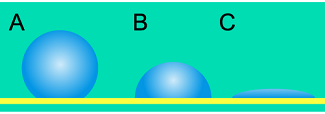 As the term implies, adhesives work through the process of adhesion. There are two important factors to understand the basics of adhesion:
- Wetting - The ability of an adhesive to maintain intimate contact with the surfaces to be bonded. Adhesives rely heavily on good wetting to achieve maximum adhesion. In the figure seen to the right, substance "A" has virtually no wetting (very poor to no adhesion), substance "B" has low wetting (poor adhesion), and substance "C" has high wetting (strong adhesion).
- Method of Adhesion:
- Chemical - The adhesive and substrate form chemical bonds:
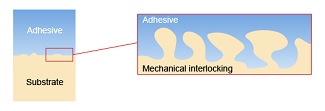
- Mechanical - The adhesive fills imperfections (voids, pores, scratches, etc.) in the substrate surface:
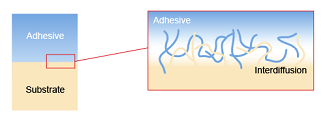
- Diffusion or Adsorption - The adhesive diffuses into the substrate at the molecular level:

Structural Adhesive Terminology
General
2-Component Adhesive - An adhesive or coating that consists of two separate components in the unreacted state. These materials must be thoroughly mixed together at specific ratios to achieve the desired properties of the cured product.
1-Component Adhesive - An adhesive or coating that consists of a single component that cures when exposed to a specific environment or energy source.
Wetting - The ability of an adhesive to maintain intimate contact with the surfaces to be bonded. Adhesives rely heavily on good wetting to achieve maximum adhesion.
Glass Transition Temperature (Tg) - The temperature at which the adhesive transitions between the glassy and rubbery states.
Cure Kinetics
Curing - The solidification of an adhesive or coating. When this process is complete, the resulting material will have achieved its intended mechanical and physical properties.
Exotherm - The chemical reactions that occur during the adhesive curing process to produce heat. The amount of heat generated is a constant for a given mass of adhesive to reach a specified degree of cure.
Open Time / Pot Life / Working Time - The time allowable between when the adhesive is mixed and parts must be mated. Mating parts after the open time expires will result in poor bond strength. This amount of time is determined by the cure rate of the adhesive and is, therefore, also dependent on temperature and the adhesive’s mass.
Handling Strength / Green Strength / Fixture Time - The time required, after mixing, for the adhesive to attain sufficient strength to hold parts together without additional fixturing. This is typically considered to be at least 50 to 100 psi shear strength. Since it is determined by the cure rate of the adhesive, it is also dependent on temperature and adhesive bond line thickness.
Time to Full Cure - The time required, after mixing, for the adhesive to reach its ultimate mechanical properties.
Purge Time - The time that a mixed adhesive can sit undisturbed in a static mixer before it is no longer dispensable.
Purge Duration - The time required to completely displace an adhesive in a static mixer.
Cure Related
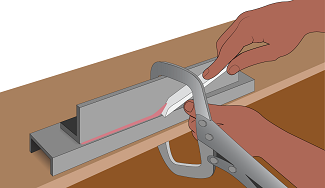
De-Roping - The removal of adhesive that squeezes out of the bond line when parts are mated. It is easiest to de-rope when the adhesive is partially cured but still soft, prior to extensive curing.
Read Through - The visual detection of the bond line on the un-bonded surface of the substrate. Contributing factors can be stress, heat, excessive squeeze out, substrate type and bond line thickness.
Physical Properties
Density - An adhesive's mass per unit volume. Commonly expressed in units of: pounds per gallon (lb/gal); grams per cubic centimeter (g/cm3) or kilograms per cubic meter (kg/m3).
Color - Cured and uncured adhesive colors are sometimes different. Color can indicate proper mix and degree of cure.
Odor - Acrylic products have a characteristic odor. Epoxies and urethanes have very slight odors comparatively.
Flash Point - The lowest temperature at which vapors from a volatile component will ignite upon the application of a small flame under controlled conditions.
Mechanical Properties
Strength - The maximum load capacity of a given material or assembly as a function of the area the load is acting over (unit of force per unit of area).
Elongation - The distance a material can stretch from its un-deformed state before failure occurs. When listed on a technical data sheet, it is:
- Usually expressed as a percentage
- Measured on neat adhesive - not a bonded part
- Extremely dependent on test method
Modulus - The relationship between stress and elongation (unit of force per unit of area). Typically the higher the modulus, the lower the elongation.
Hardness - Measured with Shore hardness tester - usually in the A or D scale.
Coefficient of Thermal Expansion - The relationship between volume change and temperature change.
Key Advantages of Structural Adhesives
Advantage
Used in structural applications
No effect on visable surface
Used on thinner substrates
Preserves smooth surfaces
Accommodates complex shapes
Ideal for dissimilar substrates
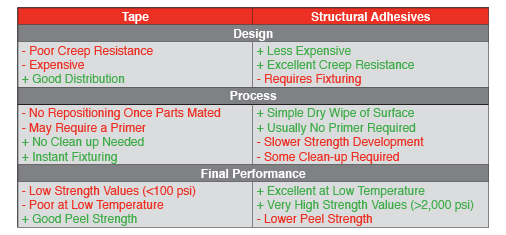
Excellent creep resistance
Less expensive than tapes
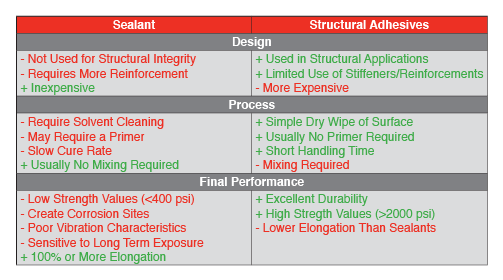
Less need for stiffeners than sealants
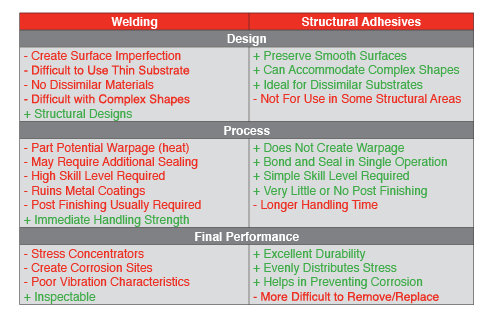
Bond and seal in single operation
Doesn't create warpage
Low skill level required
Very low to no post finishing
Usually no primer required
Shorter handling time than sealants
Excellent durability
Evenly distributes stress
Helps prevent corrosion
Excellent at low temperatures
Very high strength values (>2,000 psi)
- Are easy to use
- Require minimal surface preparation
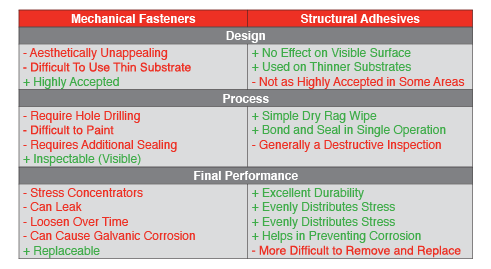
- Require no drilling of through holes, tapping operations, and other costs that are built into typical mechanically fastened joints
- Are highly aesthetic
- No visible fasteners, substrate deformation, etc.
- No refinishing with removal of mechanical fasteners and weld scars
- Are cost-effective due to reduced material costs, number of parts, labor costs, and process time
- Are available in a wide variety of packaging and dispensing options
- Cartridge (convenience) packaging - for manual dispensing
- Bulk packaging (gallons, pails, drums) - for high volume applications that use Meter/Mix/Dispensing (MMD) equipment
Design freedom is another advantage adhesives. Adhesives allow for easy joining of complicated shapes and can join dissimilar substrates (dissimilar metals or metals to composites or thermoplastics). Assembly adhesives are also multi-functional to allow for:
- Superior structural joint strength with stress distribution along the bonded area
- Simultaneous joint sealing without the need for separate sealing processes or gaskets
- Added insulation
- Vibration and sound dampening
For more information on the advantages of structural adhesives versus other joining methods, including including welding, mechanical fasteners, tapes and sealants, please click here.
Structural Adhesive Types (Chemistries)
Structural adhesives are thermoset polymers, commonly available in three main types, or chemistries: Acrylic Adhesives, Epoxy Adhesives, and Urethane Adhesives. They will not melt or change with environmental exposure, temperature or time. Acrylics and epoxies can withstand temperatures from -40°F to +400°F. Most urethanes are good up to 250°F with a low end slightly better than the others. Exposure to water, humidity, oil, gasoline, solvents, and other environmental factors won’t weaken bond strength in properly designed joints. Two-component adhesives cure at room temperature, most within 24 hours. Multiple cure speeds are available (Slow, Medium and Fast Speeds).
In general, acrylic adhesivess excel at bonding unprepared metals, composites and thermoplastics. Urethane adhesives offer resiliency and flexibility, and are candidates for joining composites, thermoplastics, natural materials and prepared metals. Epoxy adhesives give the highest strengths when bonding prepared metals, composites, thermoplastics and natural substrates such as wood. Continue reading the sections below for more details on the properties and differences between the three main structural adhesive chemistries.

Acrylic Adhesives
The viscosity of acrylic adhesives allow for very easy dispensing by hand while maintaining a non-sag characteristic. Also, acrylic adhesives change color during cure, giving a visual indication that the adhesives is cured. Another key property of acrylic adhesives is that they can have a long room temperature open time but once they begin to react, they quickly reach handling strength. Other adhesive chemistries are not able to match this cure profile.
- Two components or "parts":
- Acrylic (A-Side)
- Accelerator (B-Side)
- Uncured properties:
- Odor
- Creamy, paste-like consistency
- Application properties:
- Insensitive to small variations in mix ratio
- Acrylic adhesives can be used with a variety of accelerators (curatives)
- This can affect mix ratio, viscosity, color change and application method
- Have a range of open times from several minutes to about an hour
- Cure rapidly to handling strength and full cure at room temperature
- Cure can be accelerated with moderate heat (<140°F, 70°C)
- Cured properties:
- Excellent adhesion to unprepared or minimally prepared metals, composites, and most thermoplastics
- Excellent impact, shear, and peel strengths
- Moderate elongation (~40%)
- Withstands temperatures up to ~300°F (150°C) depending on product
- Surface cure is inhibited by oxygen in air – results in a thin layer of surface tack on exposed areas
- Does not bond well to porous surfaces (O2 inhibition)
- Key advantages:
- Designed to bond to a wide range of metals and composites with little to no surface preparation
- Will bond through light surface oils and similar rust preventatives
- No scuffing, sanding, or primers typically required to achieve adhesion to bare metals
- This offers process efficiencies and cost savings
- Maintains strength and adhesion after long term exposure to multiple environments, such as salt fog, humidity, thermal cycling, and various chemical exposures
- Ability to withstand post-processing and e-coat temperature exposures up to 400°F
- Offers the ability to utilize the higher structural strength of bonding to the pre-painted surface as opposed to bonding to the paint layer or masking/sanding the paint layer to expose bare metal surface after coating
- Glass bead technology enables the ability to create optimum bond line thicknesses
Epoxy Adhesives
Epoxy adhesives generally tend to be viscous liquids or pastes, although self-leveling liquids are available. In general, epoxies are less sensitive to slight variations in mix ratio. Also, epoxy adhesives offer long open times, allowing for repositioning and assembly of complex shapes. Final properties develop within 24 hours at room temperature.
- Two components or "parts":
- Resin (A-Side)
- Hardener (B-Side)
- Uncured properties:
- Low odor
- Tend to be very viscous liquids or pastes
- Application properties:
- Different mix ratios may be specified depending on desired final physical properties
- Relatively unaffected by humidity while curing
- Tend to have slower cure rates (with a few exceptions)
- Cure rate can be accelerated dramatically with heat
- Cured properties:
- Relatively low elongation (often considered rigid in comparison to acrylics and urethanes)
- Good high temperature strength - chemically stable up to 125°C (250°F) and some even to 200°C (400°F)
- Very good chemical resistance
- Bonds well to porous substrates
- Good adhesion to a wide variety of materials, but surfaces should be very clean
Urethane Adhesives
Urethane adhesives are offered as either one and two component systems. Also, urethane adhesives are formulated with much lower viscosity compared to epoxy or acrylic adhesives. Urethanes are inherently sensitive to moisture which reacts with the isocyanate in the system. Care should be taken to avoid high humidity conditions and moisture in the substrates.
- One component solutions available
- Two components or "parts":
- Resin (A-Side)
- Curative (B-Side)
- Uncured properties:
- No noticeable odor
- Single component (one part) and two component systems
- Flowable liquid consistency
- Sensitive to contamination by moisture - Moisture will react with the isocyanate leading to shelf life issues
- Application properties:
- Easy to dispense – some have low viscosities that allow the use of gravity-feed, low-cost meter-mix-dispense (MMD) equipment
- Cure behavior and final properties can also be negatively affected by moisture in air or substrate
- Wide range of cure rates available by choosing appropriate B-side (B, C, D,…)
- Cure rate can be accelerated with heat
- Cured properties:
- Can attain very high elongation (>100%) while retaining the performance of a structural adhesive
- Bonds well to thermoplastic and thermoset substrates
- Do not form durable, environmentally resistant bonds to bare or unprepared metals
Structural Adhesive Application Guide
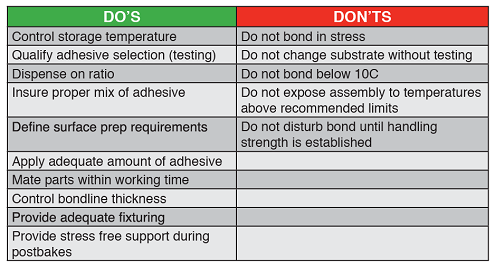 General Structural Adhesive Process Guidelines
- Maintain recommended adhesive storage conditions
- Maintain FIFO (first in, first out) inventory control
- Maintain a drum change log (date and lot number)
- Proper storage temperatures are listed on Product Bulletins
- Dry-fit parts, fixtures and clamping
- Avoid bonding in stress
- Adjust fixtures and clamps to control bondline thickness
- Practice the method of adhesive application
- Know what you are doing before you start
- Pick logical points to start and stop the adhesive application
- Practice adhesive dispense path and remember to “pull” vs. “push”
- Don’t drag hoses through the adhesive
- Ensure any required surface preparations have been properly applied
- Surfaces should be free of dirt and debris and cannot have any oxidation or corrosion
- Be certain the adhesive can be applied – and the parts mated and clamped – all within the working time of the adhesive
- Adhesive bead size is a key determinate
- Review and record the ambient temperature and/or the surface temperature of the substrates
- Ensure adhesive is dispensing in the proper ratio
- For Cartridge applications, level plungers and purge static mixer prior to each use
- Keep in mind that material left in static mixer is reacting
- For Meter Mix Dispense (MMD/Bulk) Applications, perform a routine ratio check on equipment and create/maintain a ratio log
- Ensure the proper mating and fixturing of bonded components
- Avoid re-opening of joints – make sure you have enough fixtures and watch for “spring back” of opposing ends of clamped locations
- Slide to re-position
- Know your fixturing time (which is also relative to ambient temperature)
General Adhesive Joint Design Guidelines
- Design for shear and compressive loading; avoid peel and high tensile loading.
- Adhesive joints require surface area; for structural applications, design bond widths of at least 0.75” (19mm).
- Consider the effects of thermal expansion.
- Use strategic placement of welds or mechanical fasteners in areas of unavoidable peel and tensile loads.
- This is also a fixturing consideration – the placement of a weld or a mechanical fastener can be used as an alternative to a removable “pick and place” type fixture.
- Carefully consider the surface condition, coating, and substrate that is being joined.
- Success with an adhesive in one application does not automatically qualify it for another.
Further Guidelines for Adhesive-Bonded Joint Design
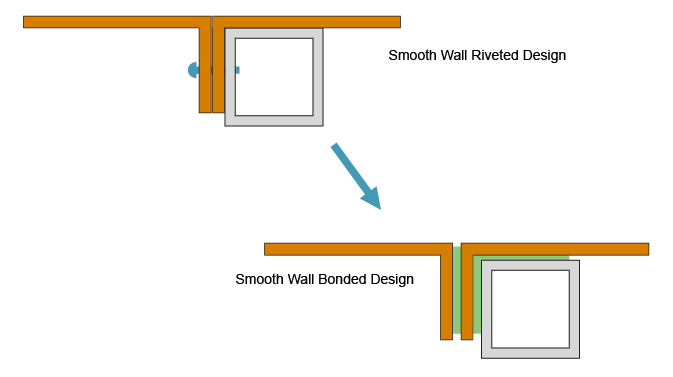
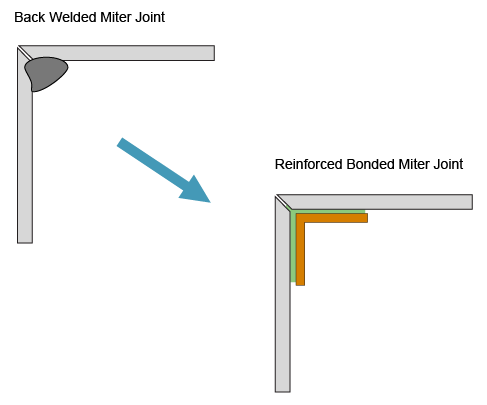
Joint configuration should be designed so that the basic stress is primarily shear. Tensile, or compressive with cleavage, and peel stresses should be minimized on the bond line. Joints should be designed so that all of the bonded area equally shares the load. The illustrations below depict both recommended joint design alternatives and joint designs to be avoided.
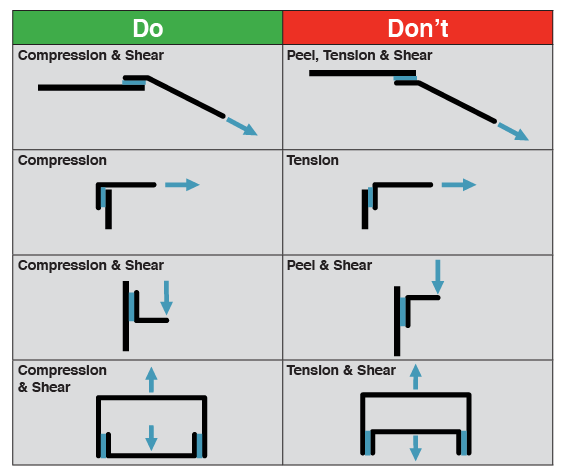
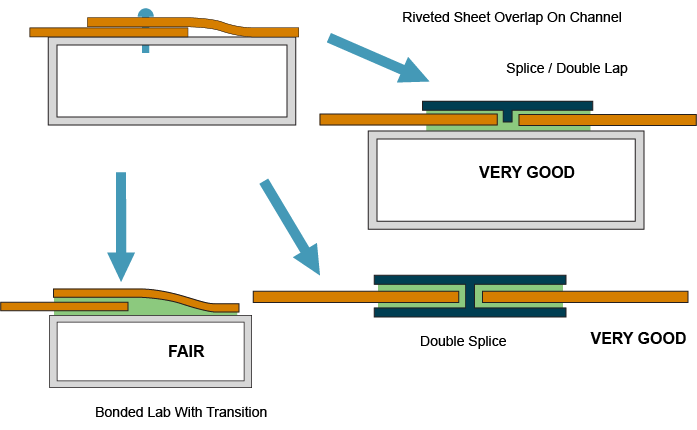
Lap Joints - Lap joints are the most practical design and applicable in bonding thin materials. Lap joints are used to enhance joint strength by reducing its potential to peel stress.
Butt Joints - In tension, the straight butt joint is impractical for load bearing assemblies. To minimize this stress, the angle design applies compression. Compressive loading will not affect the joint unless bucking of the vertical component occurs.
Joint Design Alternatives
Substrate Surface Preparation
The amount of surface preparation required for good bonding will depend upon both the substrate and the adhesive that is used. In general, obvious dirt and loose particles should be removed from the bond surface with a clean, dry rag. Using compressed shop air to blow off parts is not recommended, since shop air usually contains water from condensation and oil from the compressor that can contaminate the bond surface. Avoid handling the bond area after the surface has been prepared. Dirty hands/gloves, soap, mold release, grease, etc. can contaminate the surface and potentially lead to poor adhesion.
Prior to adhesive application, remove soils, greases, oils, dust, mold release agents, rust and other contaminants from substrate surface with the use of a vapor-free solvent, such as MEK, acetone or isopropyl alcohol.
- Plastics – Clean the surface with a dry rag or dampened solvent rag.
- Metals – Prime, paint or grit blast, followed by solvent wash for optimum bond performance.
Preparing Convenience Cartridges for Use - Purge and Run Adhesive
- Cartridges are chosen based design needs for the adhesive, including:
- Material compatibility
- Mix ratio
- Mixing tip requirements
- Adhesive viscosity
- Dispensing guns are designed for specific cartridges, both manual or pneumatic are typically available.
- Cartridge designs include: side by side or coaxial.
- Precautions to be taken when dispensing from cartridges:
- The plunger should be leveled so both components are being dispensed from the start.
- At first dispense the pressure should be low and then increased to desired flow rate.
- The first mixer tip of adhesive (5 to 10 grams) should be discarded to ensure proper mix.
- Small quick shots can lead to off ratio condition due to flexing of the cartridges walls.
Below are best practices on preparing two-part adhesive and seam sealer cartridges for optimum bonding results (refer to Figures 2-7). The static mix tip may generally be left attached to the cartridge if the entire cartridge is not used. The cured adhesive in the tip will act as a cap. However, it is possible in some cases that mixed, cured adhesive will block the nose of the cartridge, so best practice is to remove the static mix tip and replace the original plastic plug(s) — taking care to match the proper sides — for longer-term storage.

Cartridge Dispensing Guns - Video Tutorials
Understanding Meter Mix Dispensing (MMD) Equipment
NOTE: If you are using manual cartridge dispensing as described above, the following section on MMD equipment can be skipped, you can proceed directly to the "Preparing Bond Area" section.
In contrast to the use of cartridges, meter mix dispensing (MMD) enables the use of bulk containers of adhesives. The MMD equipment is generally manufactured and dedicated to a specific volume mix ratio, covering a range from 1:1 by volume to 22:1 by volume. MMD equipment can be utilized by an operator in a totally manual fashion. However, if you anticipate the need for semi-automated or fully automated applications in the future, the equipment can be supplied with appropriate functionality that allows for totally robotic operation. Anticipating the need for this type of capability will save cost of refit or replacement of the equipment as production volumes grow.
The type of MMD unit selected is based on the type of adhesive used for the application and the anticipated production volumes. In order to select the right piece of MMD equipment, one needs to know the details of the manufacturing process and possible future needs.
Reasons for using MMD equipment:
- Accurate and consistent mixing
- High quality MMD equipment provides the capability to maintain mix ratios within +/- 5% by weight and consistently providing this level of accuracy shot after shot
- High viscosity adhesives that are difficult to hand mix or dispense from cartridges
- Highly repetitive shot volumes (automation)
- Removing variation in the process introduced by human operators
- Large volume production
- MMD equipment can dispense adhesives at rates approaching a kilogram per minute while maintaining accuracy and rate of production
- Waste reduction (disposal of cartridges)
- Cost savings – bulk adhesives cost less (cost per volume) than cartridges
- ROI – 3 years or less
Types of MMD equipment:
- Rod Meter or Piston Meter
- Progressive Cavity Meter
- Double Acting Piston Pump or Proportioner
- Gear Meter
- Gerotor
Rod Meters and Piston Meters
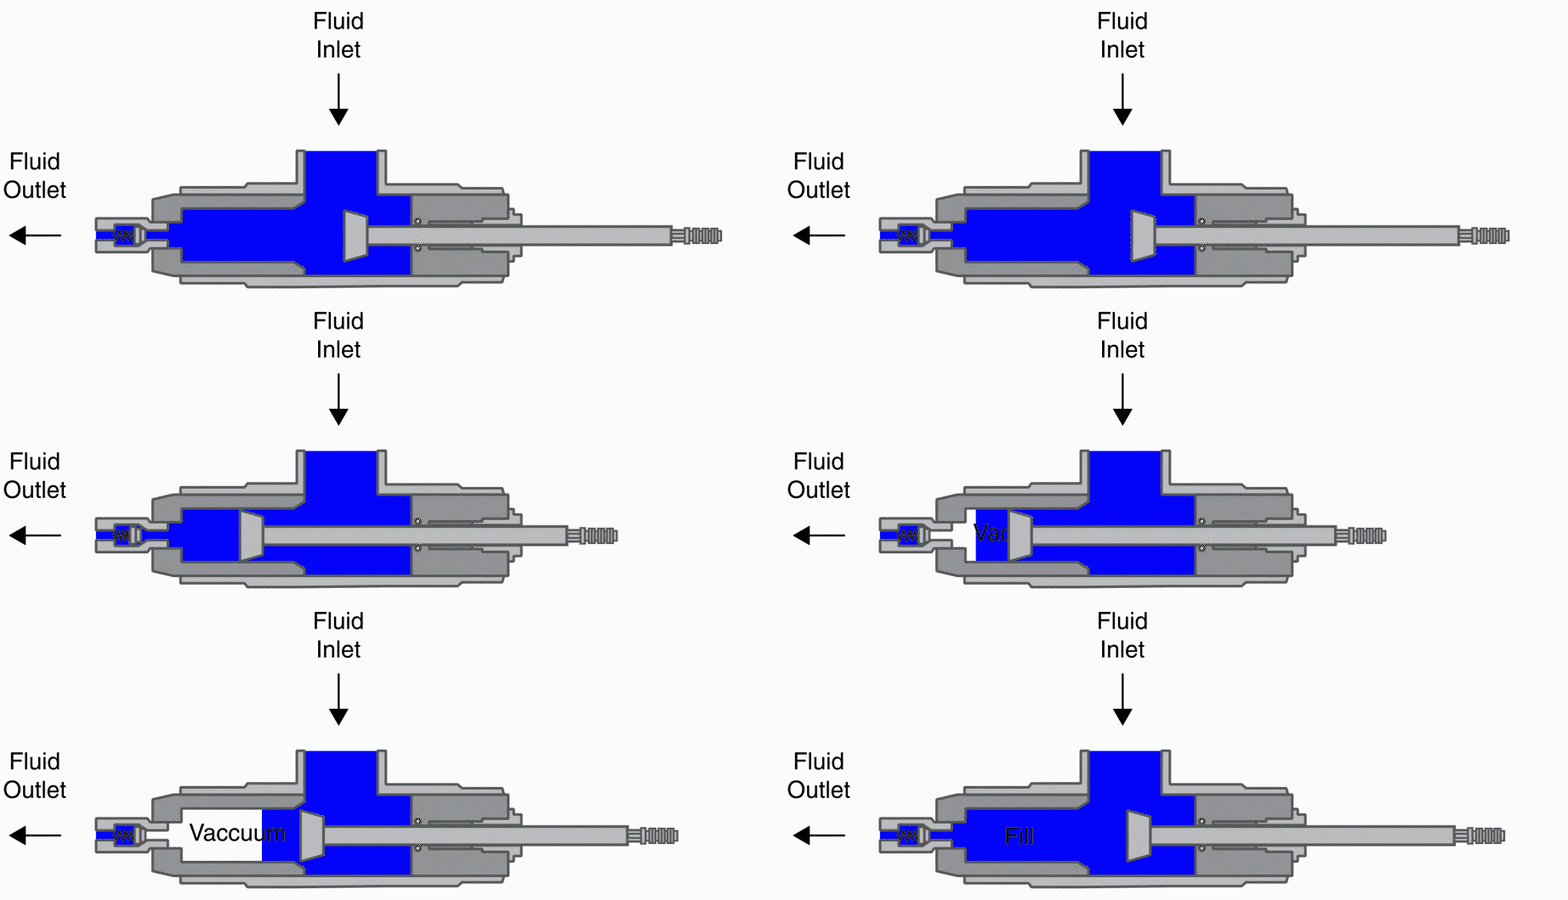
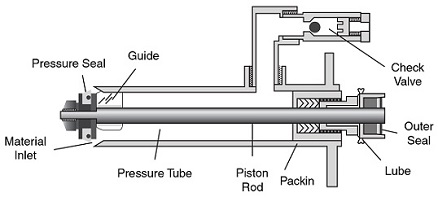
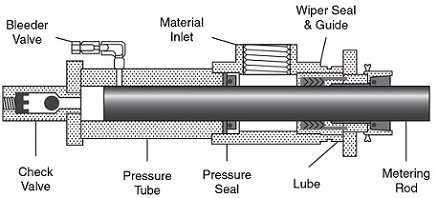
- Adhesive is pumped into the pressure tube when the piston or rod is in the retracted position
- The piston or rod is advanced into the pressure tube displacing the adhesive
- The piston or rod for both components travel at the same time
- Metering equipment with two identical pistons or rods will displace equivalent volume from each meter on each stroke
- This is a 1:1 ratio by volume
- Decreasing the diameter of one of the pistons or rods allows for different volumetric mix ratios (2:1, 4:1, etc.)
- The pressure tube must refill after each shot
- NOTE - Rod meters are typically the best choice for adhesives containing glass beads or having very high viscosity. This is because the glass beads can degrade the function of the pressure seals in a piston meter. Rod meters do not become clogged with the glass beads and they retain higher internal pressures. However, piston meters are generally a more cost effective solution if the adhesives do not contain glass beads or if high pressures are not an issue.
Piston Meter
Rod Meter
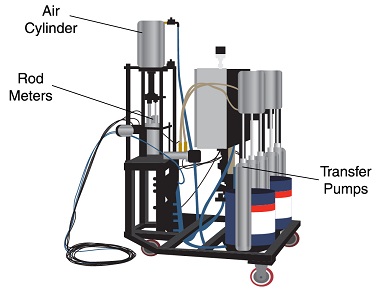
Pictured below is a portable rod metering system designed for use with acrylic structural adhesives. The common air cylinder drive unit on the rod meters helps to ensure a constant mix ratio (strokes both rods at the same time). This unit also incorporates integrated transfer pumps that supply the adhesive to the rod meters.
Progressive Cavity Meters
- Adhesive is pumped down the pressure tube via the rotation of the screw within the pressure cylinder wall
- The principle is similar to the Archimedes Screw
- Metering equipment with two identical progressive cavity pumps will displace equivalent volume from each meter turning at equivalent rates
- This results in a 1:1 ratio by volume
- Changing the rate at which one of the screws turns allows for different volumetric mix ratios such as 2:1 or 4:1
- Provide continuous flow without the need for refilling the pump
- Are good for heavily filled materials such as silver-filled epoxies

Proportioner Systems (Double Acting Piston Pumps)
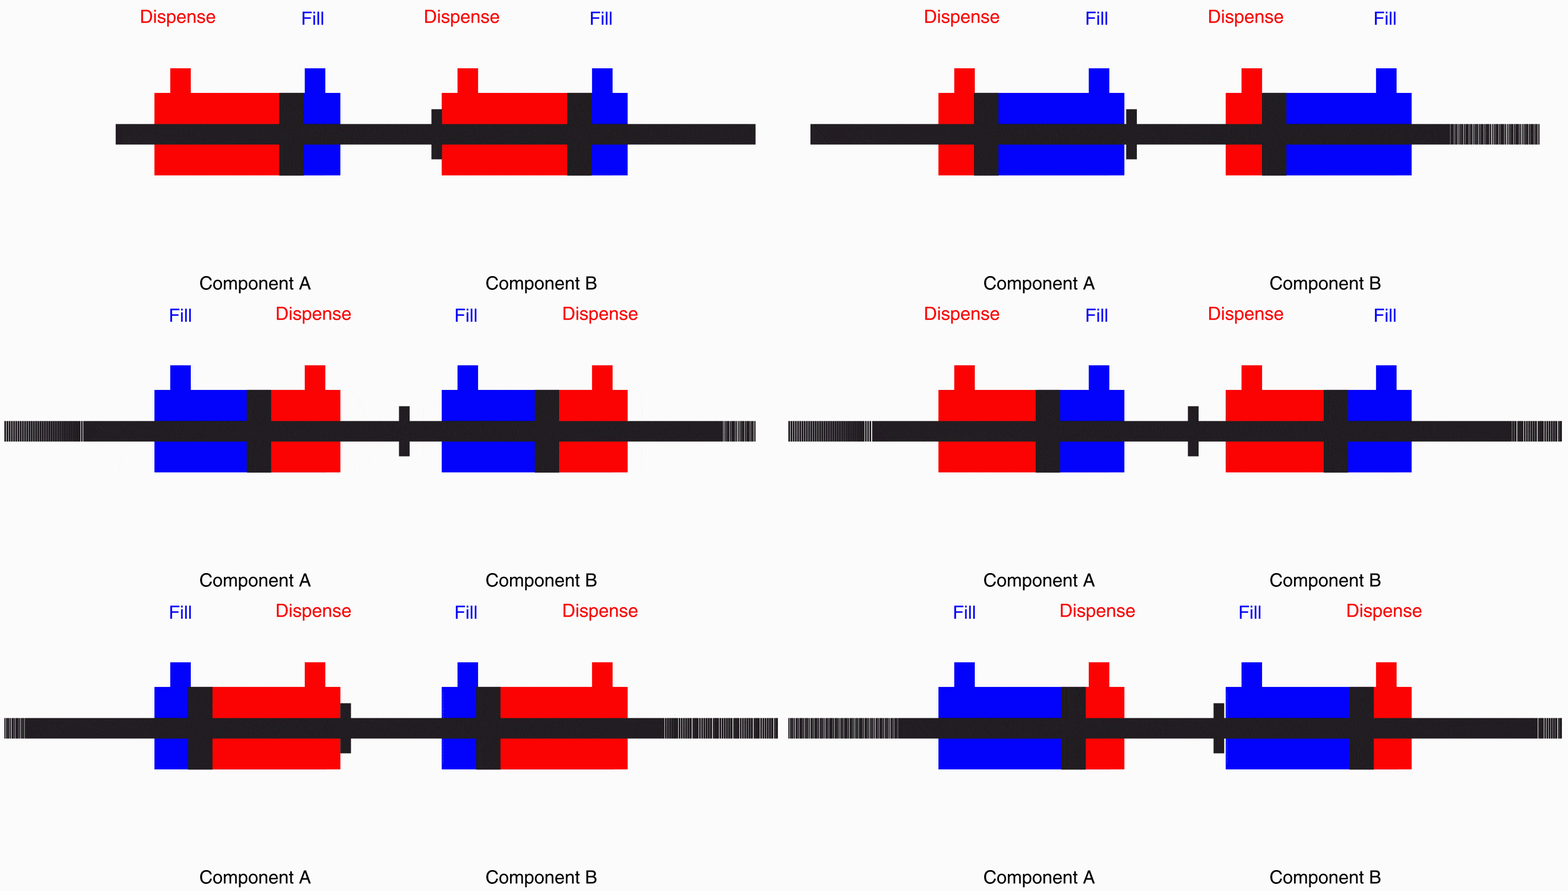
- Two double acting pistons are used to meter two component adhesives
- With each stroke, adhesive is dispensed from both pistons
- As the piston or rod moves to the left, adhesive fills the right side and dispenses from the left side of each pressure cylinder
- When the piston or rod reverses to the right, the pressure cylinders refill on the left and dispense from the right
- The refill stroke of a normal piston or rod meter is eliminated since refilling also occurs during the dispense stroke
- Metering equipment with two identical pistons or rods will displace equivalent volume from each meter on each stroke
- This is a 1:1 ratio by volume
- By decreasing the diameter of one of the pistons or rods allows for different volumetric mix ratios such as 2:1 or 4:1
- NOTE - Proportioner systems with rod metering would be the best choice for adhesives containing glass beads or having very high viscosity. This is because the glass beads can degrade the function of the pressure seals in a piston meter. Rod meters do not become clogged with the glass beads and they retain higher internal pressures. Proportioner systems also offer the advantage of uninterrupted flow.
Gear Meters (Gear Metering Pumps)
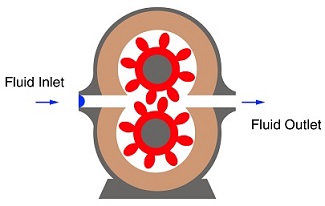
- Dispenses via interlocking gears being driven by a common drive motor
- Volume of the cavity created by the gear teeth and the pump wall determines the volume output of the dispensing equipment
- Mix ratio is controlled by pairing two pumps with the same volume running at the same rpm for 1:1 ratio materials
- Pairing with a smaller volume pump or reducing the rpm on the second pump will lead to different mix ratios, e.g. 2:1, 4:1, or 10:1
- Offer Continuous flow, good for high volume applications
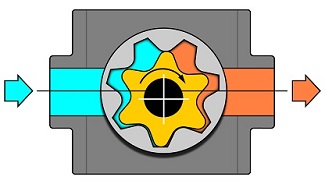
Gerotors (Gear Rotor Metering Pumps)
- Dispense fluid via cavity formed from the rotation of an asymmetric impeller
- The volume of the cavity created by the impeller and the pump wall determines the volume output of the dispensing equipment
- Each gerotor usually uses a common drive motor, so they rotate in unison at speeds proportional to the desired mix ratio
- Mix ratio is controlled by pairing two pumps of the same size for 1:1 ratio materials
- Other mix ratios can be set by adjusting the rpm of one of the pumps or by substituting a gerotor with less capacity
- Offer continuous flow, are good for high volume applications
- Gerotor pumps are NOT compatible with glass bead containing adhesives
- Are the most cost effective method of metering materials at very high throughputs
Key Components of MMD Equipment

- Two Component Dispense Valve with Static Mixer
- Controls the flow of the two component adhesive
- As the valve is triggered the two components meet and flow through a static mixer
- The fully mixed adhesive exits the tip of the static mixer and is applied to the substrate
- Air or magnetically actuated valves are recommended over manually controlled valves
- Designed for positive on/off flow control of adhesives
- Eliminates the need for cleanup from material drips and run-on between bead and shot applications
- Can be utilized in either manual or automated applications
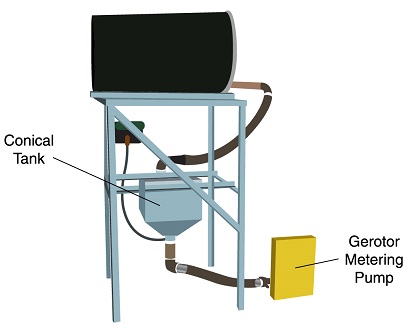
- Gravity Feed Material Transfer System
- The adhesives used in these systems are generally low in viscosity and therefore feed the pumps using gravity
- This saves the additional cost of transfer pumps
- Material flows down from the drum to the conical tank (sometimes referred to as a "day-tank")
- The conical tank then supplies the adhesive to a metering system
- The drum can be replaced when empty while conical tank supplies dispensing system
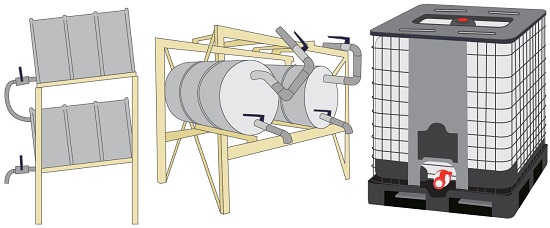
- Examples of drum racks and totes for gravity feed materials
- Drum over Drum - the second lower drum replaces a conical day tank
- Poly Drum Rack
- 275 Gallon Tote
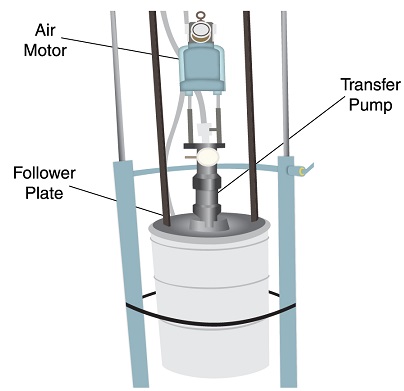
- Transfer Pump
- Used when the adhesives are too high in viscosity to flow freely as in the gravity feed system seen above
- Transfer pumps move the adhesive from the bulk container directly to the metering system
- These type of pumps are available for bulk containers of various sizes
- Typical components of a transfer pump include
- The follower plate that rests on the surface of the adhesive in the bulk container (drum)
- The transfer pump itself
- The air motor to drive the pump mechanism
- Drum Types
- Different drum types are used for different materials depending on the viscosity and the method of transferring the adhesive to the metering system:
Open Top Drums

Typically used for higher viscosity (paste) adhesives where a transfer pump with follower plate would be used
Tight Head Drums
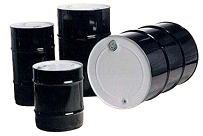
Usually used for low viscosity materials, either with gravity feed systems or siphon style transfer pumps
Ratio Checks for Two Component MMD Equipment
- Accurate and consistent mix ratios are critically important when using two component structural adhesives
- The mix ratio is specified for a specific piece of MMD equipment
- The accuracy of the mix ratio should be checked often and recorded so that trends can be observed
- To check the mix ratio of an MMD unit, dispense a small amount of each adhesive component into separate pre-weighed containers
- Then use the net weight and specific gravity of each component to calculate volume of the material dispensed
- Be sure to make several replicate checks and average their results
- The value should be within 5% by weight of the specified value
- Specific documents on checking mix ratio and example manufacturing logs are available from technical support
- Model specific information on mix ratio, maintenance and troubleshooting the equipment is available from the equipment manufacturer
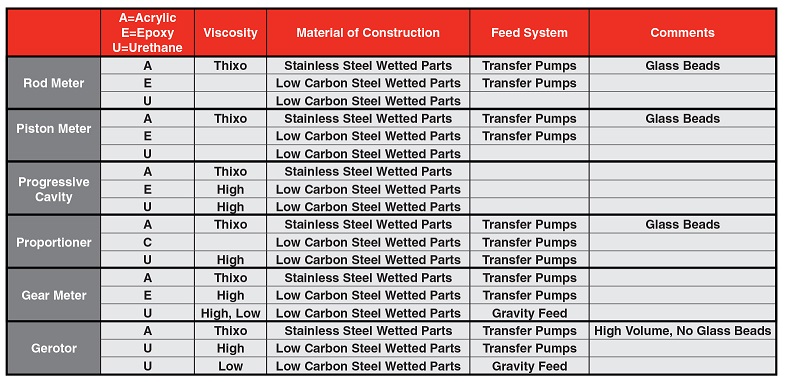
Selection of MMD Equipment for LORD Structural Adhesive Chemistries
The chart below lists the various types of MMD equipment previously described on this page and the LORD chemistries which can best be dispensed with each particular machine type. Note that there are many manufacturers of MMD equipment in the global marketplace and any type of equipment could be manufactured to dispense any of the chemistries.
- Acrylic Adhesives - rod metering technology is recommended. Given the need to dispense accelerators containing glass beads, rod metering equipment is less likely to be damaged by these components in the adhesive and thus provide a longer service life.
- Epoxy Adhesives - rod metering technology is recommended. LORD epoxies such as 310, 320 and 380 tend to have very high viscosities and therefore need equipment capable of generating high dispensing pressures. However, conditioning the adhesive is possible to low viscosity. If the adhesive is conditioned or if a low viscosity epoxy is being utilized, lower cost piston metering systems are acceptable.
- Urethane Adhesives - gerotor metering systems are the most cost effective and efficient method. This is particularly true for the gravity feed urethanes such as 7100 or 7542 family. Urethane applications frequently require high rates of dispensing or long beads without interruptions. These applications lend themselves well to the gerotor technology.
Preparing Bond Area
Structural adhesives work best at a very thin, controlled bond thickness (10 to 20 mils), and they sometimes contain glass bead “spacers” to set this bond gap. Prior to dispensing the bead, attempt to remove any scrap material from the substrate such as protruding burrs, welds, or other irregularities that would prevent the two bonding surfaces from lying flat on top of one another. Apply adhesive in a continuous bead in the desired locations, taking care that the dispensed pattern will not cause air to be trapped in the bondline when the substrates are mated. A single adhesive bead dispensed in the center of the bond area is generally preferred.
Estimating Material Coverage
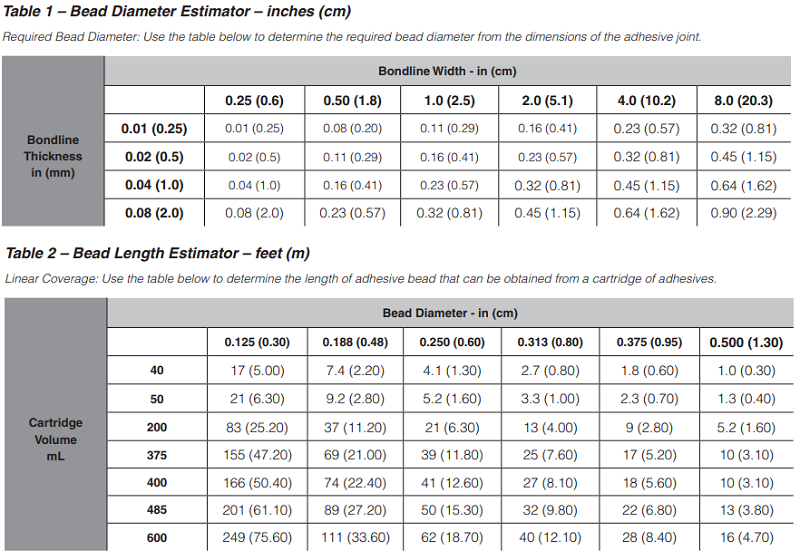
The bead diameter should be predetermined based upon the desired final bondline width and thickness. Table 1 can be used as a guide for sizing the adhesive bead diameter.
Note: These bead diameters will yield an excess of 10 percent in case of irregularities in the surface.
Approximately how much structural adhesive do I need? Use our Structural Adhesive Volume Estimating Tools.
Engagement area is critical to adhesive performance, so it is important to apply enough adhesive to fill the designed joint. Insufficient adhesive quantity, or introduction of air into the adhesive, will cause a reduction in bond strength and a characteristic pattern known as “spider webbing” (the pattern is visible when parts are disassembled). This problem can also be caused by insufficient or ineffective clamping, as detailed in the section following.
Refer to Table 2 for estimated linear foot coverage based on cartridge size and bead diameter.
Open Time / Working Time
Open Time is the amount of time from when the adhesive starts to travel down the static mix tip until the parts must be mated in order to deliver the specified bonding performance. Working Time is often used synonymously with Open Time, but working time can also refer to the time after the substrates are mated and can still be (slightly) re-positioned relative to each other.
It is important to work quickly to mate parts before the adhesive Open Time expires. Knowledge of the estimated Open Time or Working Time is particularly important when bonding large parts that have long adhesive bead lengths, and during periods of higher than normal temperatures within the production facility. Higher temperatures will generally reduce Open Times due to acceleration of the cure. In general, Open Time can be estimated by the hardness of the dispensed adhesive bead. If the adhesive bead cannot be readily compressed and spread, it has most likely passed beyond its Open Time. However, epoxy adhesives can have an additional condition referred to as “blushing,” which can limit their Open Time without any indication of bead hardening. When the working time is exceeded, the adhesive will no longer wet out on one of the surfaces to be bonded. This will generally cause a reduced bond strength and be visible as a shiny, very smooth surface on the adhesive after disassembling the bonded parts, in contrast to the rough surface generated with good, cohesive failure. The technical data sheet for each adhesive should contain specific information related to Open Time/Work Time.
Positioning Parts
Place parts in position as gently as possible, watching that the mating process works to eliminate trapping air in the bondline. Avoid applying pressure initially, allowing the clamping system to do this work. After a part has been mated and needs to be moved or repositioned, it is CRITICAL that the substrates are not pulled apart during the manipulation. This introduces air gaps into the adhesive that significantly weaken the bond, and may even prevent the adhesive from curing completely. If a part needs minor repositioning, ALWAYS SLIDE the part to the new position. If a part needs major repositioning, it may be better to separate the substrates, remove the adhesive, and begin the bonding process anew. Sliding the part over a long distance may scrape all of the adhesive out from the intended bond area and result in poor bonding.
Fixturing Methods
- Clamps
- Standard C-clamps
- Custom built clamps
- Pneumatically actuated clamps
- Weights
- Low-tech method
- Slow and labor intensive
- Magnets
- Only works on ferromagnetic substrates
- Hemming / Clinching
- Fasteners
- Can have the tendency to produce uneven bondline thickness, depending on substrate stiffness
- Welds
- Spot welding in combination with bonding is used in the automotive industry
- Ruins the bond locally
- Excellent design for peel resistance
- Self-fixturing designs
Clamping Parts
Parts should be positioned and clamped within the working time of the adhesive. Apply uniform pressure to the joint as soon as possible after mating the parts, spreading the adhesive bead and compressing it to the desired thickness. While clamping, special care should be taken to avoid “levering” the parts, causing the bond to separate on the opposite end. Uniform pressure (pressure spread out over the length of the bondline) is very important, especially when working with thin gauge or non-uniform parts. Effective methods for applying uniform pressure can include:
- Pre-built fixtures, which provide the most reproducible results.
- Multiple clamps or weights on spreader bars, which can be used on large parts when fixturing is not available. A spreader bar is a stiff material, often steel or aluminum channel or angle, which is clamped at several locations over the bondline.
- Standalone clamps or weights may be used on small parts, or when the mated parts are stiff enough to not need spreader bars.
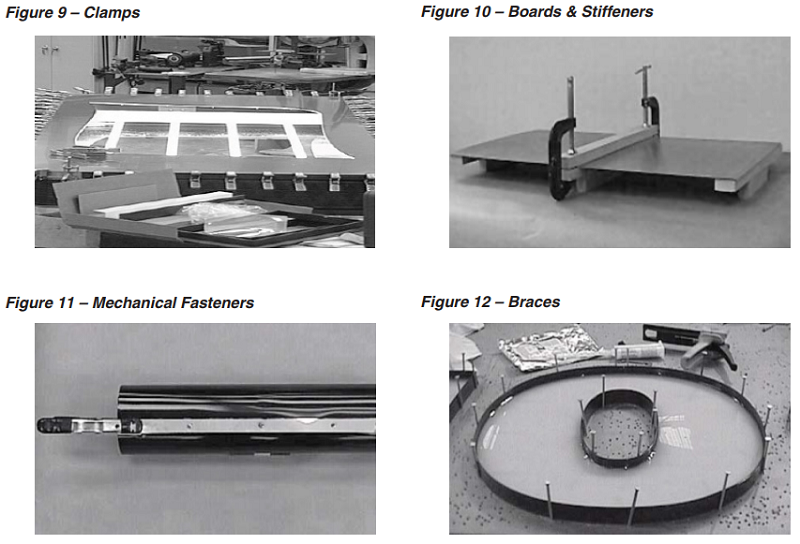
Immediately after the parts are positioned correctly, they must be weighted with even pressure until handling strength is achieved. Some of the means typically used to accomplish this are clamps, boards/stiffeners, weights, mechanical fasteners or braces.
- Maintain even pressure across the assembly (refer to Figure 9). Avoid applying pressure in areas that allow the assembly to “bow.”
- Boards can be used to apply even pressure across the bondline on flat assemblies (refer to Figure 10). Weight bonded assemblies with sand bags, bean bags or other formable materials to distribute weight evenly.
- Mechanical fasteners (screws, rivets, bolts) can be used to fixture particularly difficult-to-clamp areas and can be removed after handling strength is achieved (refer to Figure 11).
- Braces can be used to hold odd-shapes in place while curing (refer to Figure 12).
Clamping Time
Bonded parts should remain clamped until the Handling Time of the adhesive has passed. Handling Time is an estimate of the amount of time required from when the adhesive starts to travel down the static mixing tip until the adhesive has cured enough to ensure the bonded parts will not shift when handled (roughly 50-100 psi bond strength). Handling Time is usually dependent upon cure temperature, and can also vary based upon factors such as the amount of adhesive applied, the bondline thickness, the type of substrates being bonded, and environmental factors such as humidity. The technical data sheet for each adhesive contains specific information related to Handling Time.
De-Roping Adhesive
 Excess adhesive that is squeezed out at the seams between mated parts may be removed (after it has gelled or partially cured at room temperature) by scraping it off with a putty knife. This de-roping process can also be used with a heat curing process, scraping off the excess adhesive while it is still hot enough to remain soft. Solvents such as isopropyl alcohol or acetone can be used to remove smears or adhesive residue left behind by the de-roping process.
Adhesive Removal
If substrates are accidentally pulled apart or need major repositioning after the adhesive is applied, the adhesive should be removed and the bonding process restarted. The process for doing this is outlined to the right.
- Use a plastic putty knife to scrape off the adhesive. If this proves difficult because the adhesive has begun to cure, a heat gun can be used to soften the adhesive while scraping.
- Wipe off the bond area using a clean cloth and isopropyl alcohol solvent. Acetone can be used as an alternative solvent, and can sometimes be more effective in removing adhesive residue.
- Repeat the bonding process.
Bonded Part Removal
If for some reason, bonded parts must be separated after the adhesive has fully cured, a heat gun may be used to soften the adhesive. It may be helpful to remember that adhesives are generally stronger in tension or shear, and parts can be separated more easily if pulled apart with a peel load.
Ideal Failure
When bonded parts are separated, the residue pattern from failure of the cured adhesive, in addition to the bond strength, can be used to diagnose the quality of the bond. The preferred method of failure for adhesive joints is cohesive failure (COH), which can be identified by the residue of adhesive left on both substrates. Cohesive failure mode indicates excellent adhesion to the substrates, with the residue divided evenly (COH) or unevenly (Thin Layer Cohesive, or TLC) between the failed surfaces. This can be contrasted with undesirable adhesive failure (ADH), which is characterized by a clean, usually shiny surface exposed on one of the two separated substrates. The ability to gain both high strength and ideal failure mode will depend upon appropriately matching the correct adhesive with the substrate to be bonded, and following the user guidelines detailed above.
For more information on failure modes, including details by substrate type, please click here.
Powder Coating after Bonding with LORD Acrylic Adhesives
Note: Clamp or fixture the assembly prior to powder coating to avoid slippage during the powder coating process. The assembly should remain fixtured until the adhesive returns to room temperature and re-hardens.
The LORD® 400, MaxlokTM, and 800 series acrylic adhesives have excellent heat resistance characteristics up to 400°F (204°C), thus reducing the concern of possible degradation of the cured adhesive during the high heat associated with the powder coating process.
LORD acrylic adhesives will not degrade at the higher temperatures associated with powder coating. However, the hot tear strengths will be very low, causing the assembly to possibly sag and slide apart — especially if the assemblies are heavy. The lower strength values make it essential that the assembly is properly fixtured or placed to avoid slippage of the bonded pieces.
Spot welds or other type of mechanical fixturing are frequently used in the industry to aid in holding the assembly in place. The area to be bonded can also be masked off the assembly prior to powder coating with bonding done after the process.
The integrity of the bond will remain unchanged after powder coating, and greater strength is often seen after exposure to heat once the assemblies have been returned to ambient temperature.
For more details and the complete instructions on this topic, please click here.
How to Avoid Bondline Read-Through
Read-through is a condition where you can see the footprint of the adhesive through the material. This is caused by shrinkage that results in a pull on the bonded materials. Read-through can occur on surfaces that are high gloss, high polish or have a mirrored finish. Thin gauge metals less than 0.030 inches are more susceptible to read-through.
LORD 810/20GB Low Read-Through (LRT) acrylic adhesive is a flexible adhesive system specifically designed for bonding metals, such as aluminum, galvanized steel and CRS, and engineered plastics, such as PC-ABS and ASA. LORD 810/20GB adhesive delivers fast cure speed and strong bonding with minimal bondline read-through (BLRT).
The following are some application tips to help you avoid read-through:
- Maintain a thin and consistent bondline of 0.010 inches (10 mils)
- Remove squeeze out
- Weight the bondline appropriately to ensure full surface contact between the materials being bonded, thereby avoiding gaps in the bondline
Structural Adhesive Applications - Common Substrates & Joining Method Comparisons
 Metal Bonding - typically replacing conventional joining methods, such as welding and mechanical fastening, in structural applications for reasons of cost, performance, and aesthetics.
- Primary Adhesive Chemistry - Acrylic Adhesives
- Common Metal Bonding Applications:
- Trailer, Transit, and Utility Bodies
- Roofs, doors, walls, panels, floors, and secondary bonding
- Underbody boxes, truck beds, bodies, and reinforcements
- Lift gates, ramps, and racks
- Trim, latches, and brackets
- Sign Assembly
- HVAC
- Containers and Enclosures
- Bus
- Aerospace & Defense
- Compenents on Fixed and Rotary Wing aircraft
- Missle Systems
 General Industrial
- Agricultural Machinery
- Antenna Dishes
- Speaker Assembly
- Specialty Construction
- Window and door mount bonding - Acrylic Adhesives
- Panel construction bonding - Urethane and Epoxy Adhesives
- Panel to frame bonding - Acrylic Adhesives
- Sealant applications - Urethane Adhesives
 Composite Bonding - typically replacing conventional joining methods such as tabbing and mechanical fastening in structural applications for reasons of cost, performance, and aesthetics.
- Primary Adhesive Chemistries - Urethane and Acrylic Adhesives
- Common Composite Bonding Applications:
- Marine
- Deck to hull
- Stringer to hull
- Liner to deck
- Bulkhead to deck and hull
- Flybridges
- Radomes
- Spoilers
- Transoms
 Accessories
- Secondary bonding
- Transportation and General Industrial
- Buses
- RV’s
- Water holding tanks
- Underground vessels
- Recreation equipment
- Kit cars
Plastic Bonding - many plastics are only bonded by a specific adhesive or type of adhesive:
- Two plastics of the same type, but from different vendors, may bond completely differently. This is usually because of differences in mold releases and plasticizers.
 Some plastics are not well bonded by any adhesives.
- The rule for cross-bonding to metal still applies: when bonding plastic to bare metal, use a metal bonding acrylic adhesive.
- Common Plastic Bonding Applications:
- Transportation related parts
- Covers for truck beds
- Trim
- Corner caps
- Sports equipment
- Canoes and kayaks
- Golf clubs
- Architectural products
- Windows and door frames
 Rigid foam columns and trim
- Office furniture
- Shelves
- Seats
- Injection molded plastic part assembly
- Appliances
- Display cases
- Toys
- LORD IMBTM Adhesives - In Mold Bonding adhesives for bonding parts during the molding process
Natural Substrate Bonding
- Masonry
- Examples - Concrete, Brick, Stone
- Epoxy adhesives are generally the best choice
- Wood
- Examples - Common Lumber, Plywood, Pressure Treated Lumber
- Urethanes are excellent wood adhesives
- Acrylic adhesives do not bond well to wood
- Ceramics
- Both epoxy and urethane adhesives generally perform well
Difficult-to-Bond Materials
- Polyolefins - require surface modification such as flame treating, corona, chemical etching, etc.
- Polyethylene
- Polypropylene
- Fluoropolymers
- Polymeric coatings containing wax or mold releases
- Wash coats on metal sheet goods
- Requires scuffing/abrading of the metal surface
- Metals
- Nickel
- Chrome
Structural Adhesive Testing & Trials
Structural Adhesive Bond Performance Tests
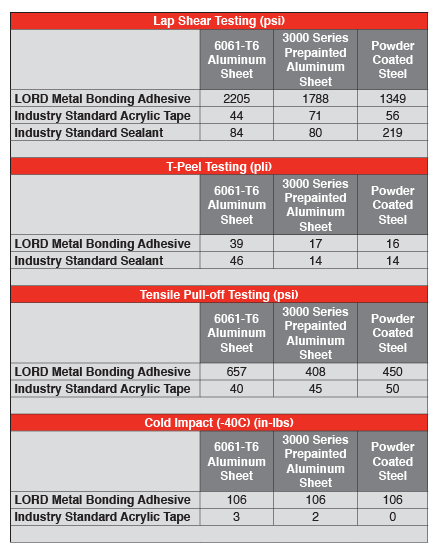
The four test methods below are commonly used to evaluate the bond performance of structural adhesives on assembly substrates:
- Single lap shear
- T-peel
- Tensile pull-off
- Cold impact (side impact)
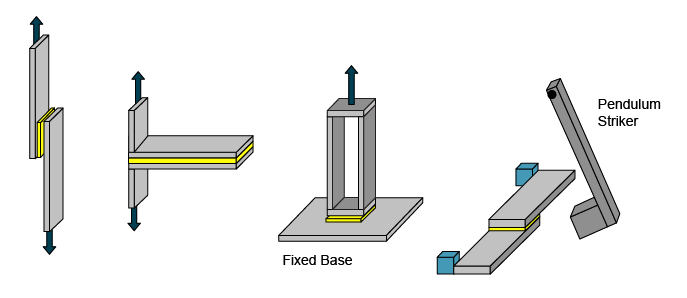
Left to right: Single lap shear; T-peel; Tensile pull-off; Side impact.
Other Structural Adhesive Performance Tests
- Environmental tests - environmental conditions can dramatically affect bond durability and performance. Common environmental tests include:
- Salt fog
- Ultraviolet (UV)
- Thermal cycling
- Custom environments
- Mechanical proporties tests - tests conducted to determine the specific mechanical properties of an adhesive.
- Testing bonded assemblies (trials) - occasionally, the only way to determine how well an adhesive will perform in a specific application is to test the actual bonded assembly. See the section below for more information on bonded assembly trials.
Structural Adhesive Bonded Assembly Trials
- Pre-Trial Preperation Checklist:
- Identify substrate and part configuration
- Conduct adhesion screen and testing to determine best adhesive and required surface preperation
- Determine number of parts to be bonded
- Estimate adhesive volume per part Use our Structural Adhesive Volume Estimating Tools
- Estimate bead size and working time requirements
- For trials it is better to use the longest work time available
- Determine application method: MMD or cartridge dispense
- Based on adhesive volume, performance expectations and equipment availability
- Review fixturing method
- Establish cure and post bake cycles
- Determine how the parts will be tested
- Establish goals for a successful trial
- Determine time requirements for equipment and adhesive preparation and delivery to location
- Establish trial date
- Practice dispensing adhesive before the trial
Structural Adhesive Bond Failure Modes
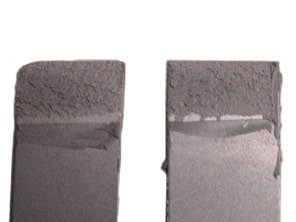
- Cohesive Failure (COH or CO) - Cohesive failure occurs within the adhesive layer. The adhesive is pulled apart by the stress applied to the bond line. Typically there is a fairly even split of adhesive remaining with each substrate as shown in the image below. This type of failure indicates that the adhesion to the substrate is higher than the internal cohesive strength of the adhesive. This mode is the preferred failure mode for metals and other strong substrates.
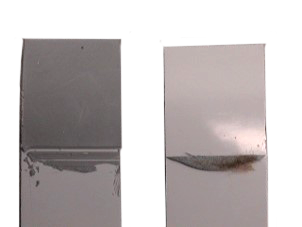
- Adhesive Failure (ADH or A) - When the failure occurs at the interface between the adhesive and the substrate, this is called adhesive failure. In this case the adhesive is lifted off one of the mated substrate without leaving any adhesive residue behind. This is not a preferred failure mode and usually indicates that the adhesion is low.
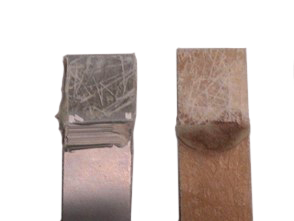
- Fiber Tear (FT) - When bonding fiber reinforce composites (SMC, FRP), a very desirable failure mode is called fiber tear. In this mode of failure the bonded surface and internal reinforcing fibers are torn from the composite substrate. It is specific only to fiber reinforced substrates and is the preferred failure mode. The fibers removed from the substrate on the right of the image below can easily be seen embedded in the adhesive on the left substrate.
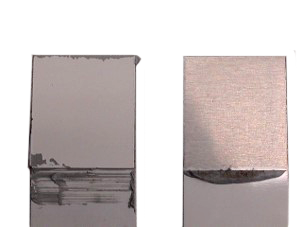
- Coating Failure (Paint Failure) - Coating failure is specific to painted or plated parts. In this mode the failure occurs at the interface between the coating and the substrate. The coating is lifted off the substrate by the adhesive, proving the coating is the weak link in the bond. This failure mode is not preferred if it results in low strength values but is preferred if results show high strength values.
- Substrate Break (SB) - Substrate break is the ultimate failure mode. It occurs when the substrate being tested fails while the adhesive joint remains in tact. It shows that the adhesive and the adhesion to the substrate surfaces are stronger than the substrate itself. This is the most preferred mode of failure.
