LORD Corporation
With more than 3,100 employees in 26 countries, 19 manufacturing facilities and 10 R&D centers worldwide, we're there for our customers.
Our Company
-
Products and Solutions
To speak to someone directly, call
Customer Support:
8AM–5PM EST
Technical Support:
8AM–5PM EST
-
Industries
To speak to someone directly, call
Customer Support:
8AM–5PM EST
Technical Support:
8AM–5PM EST
-
Our Company
To speak to someone directly, call
Customer Support:
8AM–5PM EST
Technical Support:
8AM–5PM EST
-
Feedback Button
Feedback Button

Frequently Asked Repair Adhesive Questions
General Fusor FAQs
What is the best way to prepare adhesive cartridges prior to use?
Below are best practices on preparing two-component (2-part) adhesive and seam sealer cartridges for best results:
- Insert the cartridge into the dispensing gun with the proper mix ratio set up
- When using 1:1 mix ratio cartridges of Fusor products, set the plunger for 1:1 cartridges
- When using 2:1 mix ratio cartridges of Fusor products, set the plunger for 2:1 cartridges
- Remove any cap and plugs
- Level the plungers by applying pressure to the gun until both sides of the material flow through the openings in the cartridge
- Attach the mix tip
- Apply pressure to the gun forcing the material through the mix tip
- Run out a mixer's length of adhesive on scrap material to ensure a complete mix
- Watch the video showing proper preparation of a two-part adhesive
How do you store partially used cartridges of Fusor Adhesives or Sealers?
Store the cartridge with the mix tip on (except for Fusor Foam Products 121/124 and 130). The Mix tip will serve as a cap to keep material fresh. Replace the mix tip prior to the next use. For Fusor Foams 121/124 and 130and 124 remove the mixer immediately after use and wipe the end. Then replace cap or plugs.
What primers are recommended for Fusor products?
Fusor products are tested with fully cured 2K (two-component) epoxy and 2K (two-component) urethane primers. Fusor products have not been tested with acid-etch primers.
How do I get a Material Safety Data Sheet (MSDS) or Safety Data Sheet (SDS) for a Fusor product?
MSDS/SDS are available online Fusor.com at the bottom of each product page or by emailing Lord_SDS@parker.com.
Where can I buy Fusor Adhesives and Accessories?
Call our Customer Support Center (US & Canada) 877-275-5673, submit a form on Fusor.com or email us at ParkerLordSupport@parker.com for a product recommendation. Refinish Solutions Group (RSG, initiative of Saint-Gobain) is our authorized distributor can provide you with our adhesvies, sealers and accessories.
How do I find the shelf life of a Fusor product?
Fusor labels are marked with a Lot Number and Manufacture (Mfg) Date. The label will indicate "Best Used within XX months of Mfg Date". Fusor products and repairs are not guaranteed after the shelf life of material has expired. 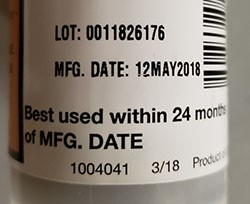
Fusor Repair FAQs
Do you have a Fusor product to repair gas tanks?
No. Fusor products have not been tested or warrantied for use on gas tank repairs.
Do you have a Fusor product for window channel repair?
No official recommendation for window channel repair. You can use glass primer and either Fusor 142/152/148/127EZ on plastic or primed metal or glass primer and Fusor 108B/110B/112B on bare metal.
Does Fusor 100EZ have to be heat cured?
To ensure a high quality repair, heat cure the entire repair area for one hour at 180°F (82°C) using a heat lamp. Note: This final heat cure will bring the plastic and adhesive up to the maximum temperature generally experienced in a bake oven or under unusual weather conditions. This step ensures total shrinkage with no "bull's-eyes" or read-through after painting.
Can you use Fusor 100EZ for bonding?
Fusor 100EZ is not recommended for bonding due to the thin consistency. The adhesive will run out of bondline and the result could be intermittent bonding due to lack of adhesive and inconsistent bondline thickness.
What type of composite plastics can I use with Fusor adhesives?
Fusor adhesives for composite repair and bonding can be used on substrates such as fiberglass, SMC, carbon fiber, FRP, RTM, Metton©, GTX, etc.
What are the steps to make a plastic repair with composite or fiber filled plastics?
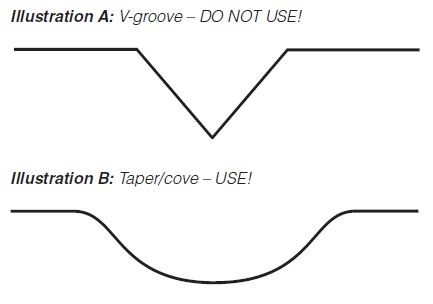
To create a Class-A finish on a composite plastic panel repair, build a "pyramid patch" as follows:
- Use an angle grinder with a 36 or 40-grit wheel. Make a gradual taper in the repair area (about 2 inches [50.8 mm] wide) rather than a V-groove (see Illustrations A and B). This will prevent "bull's-eyes" or "read-through" in the finished repair, as well as allow the panels to expand and contract in varying temperatures.
- Sand the prepared area with a DA sander or by hand using 80-grit sandpaper to smooth out the taper.
- Build a "pyramid patch" using LORD Fusor Fiberglass Cloth (Fusor #702) and LORD Fusor 100EZ/101EZ Plastic Panel Repair Adhesive. See Illustration
- When working in difficult areas, such as corners, apply the adhesive to the repair area and lightly spread it. Then, lay a piece of plastic film backing over the repair. This will help contour the repair material to the panel. Note: Do not use polyester body fillers over top of adhesives, as compatibility issues may result.
- For complete instructions, refer to Fusor Repair Procedure for Composite Repair. View Composite repair how to videos.

What adhesive and supplies do I use for bumper repair?
For all types of plastic bumper repair, you can use the following Fusor adhesives and supplies depending on the work time and temperature:
- Fusor 703 Adhesion Prep/Cleaner
- Fusor 132/133 (Super Fast) - 1 minute work time at 70°F (21°C)
- Fusor 142/143 (Fast) - 1 minute, 30 seconds work time at 70°F (21°C)
- Fusor 152/153 (Medium) - 3 to 5 minutes work time at 70°F (21°C)
- 602EZ Surface Modifier
- Fusor 700 Bumper Reinforcing Plastic Mesh (as needed)
- Fusor 114 Plastic Finishing Adhesive
- Fusor 142/143 is recommended for use in moderate temperatures and Fusor 152/153 is recommended for use in warm temperatures.
- Due to the work time of the adhesives, Fusor 142/143 is recommended for smaller repair areas and 152/153 is recommended for larger repair areas.
- Bumper repair how to videos
What types of plastic bumpers do Fusor products work with?
In combination with Fusor 602EZ, Fusor plastic adhesives can be used for structural and cosmetic repair of all plastic bumpers including TPE, TPO, TEO, PP, and ABS.
Fusor Seam Sealing & Sound Control FAQs
How do you prepare the Fusor Foam Cartridges?
Following are best practices for preparing Fusor Foam cartridges for best results:
- Remove any necessary panels and use a drop cloth to protect the surrounding area against accidental drippage.
- Remove cap from the Fusor foam cartridge and cut off the end of the cartridge tip.
- Insert the cartridge into a manual dispensing gun. Note: Due to the thin viscosity of the material, a pneumatic gun is not recommended.
- Holding the cartridge upright gently squeeze out a small amount of material to ensure that foam freely flows from both ends of the tube.
- Attach the mix tip.
- Apply a bead of Fusor foam between the vibrating panels or dispense a stream of material to fill a void. Note: When filling voids, build a dam to locate the foam where desired.
- Avoid dispensing material too quickly. Foam will expand approximately 10 times its original volume to fill voids or eliminate vibration.
- Watch the Fusor Acoustical Foam Fill video.
How do I apply foam to a vertical panel?
When applying Fusor 130 Rigid Foam to a vertical panel, hold the cartridge upright and gently squeeze out the material to the end of the tip. Allow the material to start foaming, then slowly dispense into the appropriate area. This will keep the material from running down the panel.
How do you store partially used cartridges of Fusor foam?
Remove the mix tip immediately after usage and install supplied cartridge plugs to avoid pressure build-up.
Fusor Seam Sealer FAQs
How do I prepare Fusor HD and Fusor DTM Seam Sealer cartridges?
There is a foil seal located at the nose of the cartridge. Cut the nose and puncture the foil seal before use. This will not interfere with the product as it is used or dispensed.
What if I forget to puncture the foil seal on the Fusor HD cartridge?
When using the Fusor 312 gun nothing will dispense and no blow by typically occurs. However, you need to remove the barrel, unscrew the cartridge and then puncture the seal, which will be under a minimal amount of pressure due to the plunger being pushed forward.
When using a manual gun, if extreme pressure is applied repeatedly, blow by past the plunger can occur.
What is the best way to store partially used cartridges of Fusor HD Seam Sealer?
Leave the dispensing tip on the cartridge. A small portion of material will harden at end. Remove this hardened plug and dispense.
What is the replacement tip for Fusor HD Seam Sealer cartridge?
Fusor 412EZ nozzle
Can Fusor HD Seam Sealers for bare metal be used on primed or painted metal?
Yes.
Can Fusor HD Seam Sealers be used on fiberglass?
Yes.
How do Fusor HD Seam Sealers react to clear coat?
Clear coat applied directly to the sealer should have flex agent added to avoid cracking.
Can acid etch primer be used before using Fusor HD seam sealers?
- We have not tested with acid etch primer.
- HD and DTM Seam Sealers can be applied to bare metal to save time and reduce costs.
- If a primer is desired, we recommend that primers within the standard paint manufacturer's line be used. We have tested with fully cured 2K epoxy and 2K urethane chemistries.
How long does it take for HD product to fully cure?
Approximately 1/8" per 24 hours. Thick sound pads will take longer to cure.
Do Fusor HD Sealers meet the SAE J2334 Cyclical Corrosion test standards?
Fusor HD sealers have passed 60 cycles of SAE J2334 Cyclical Corrosion Specification on bare metal.
What colors are available in Fusor HD Seam Sealers?
Select the appropriate products based on color needed:
- 802HD (white)
- 804HD (gray)
- 805HD (black)
- 806HD (beige)
How do you apply Fusor HD or High Definition Seam Sealers?
- If sealing bare metals, scuff the metal surface with a red scratch pad. Blow off area with dry, filtered compressed air and apply Seam Sealer.
- If sealing primed metals, prime the surface using a two-component primer according to paint manufacturer's instructions. Allow primer to cure completely per manufacturer's recommendations. Typical cure times are 30 minutes at 140°F (60°C) or two to three hours at room temperature. Scuff the primed surface with a red scratch pad. Blow off area with dry, filtered compressed air.
- If sealing SMC or Fiberglass, scuff the surface with a red scratch pad. Blow off area with dry, filtered compressed air.
How do you tool Fusor HD High Definition Seam Sealers?
You can tool the Fusor HD Seam Sealers with the reducer from your paint system. Avoid using other solvents or water as this may inhibit the curing characteristics or performance of the product.
When can you paint Fusor HD Seam Sealers?
Immediately or within 30 days on dirt and dust-free surface. If after 30 days, scuff lightly.
How do you apply Fusor 800DTM and 803DTM Direct-to-Metal Seam Sealer/Adhesive?
Clean the area to be sealed with Fusor adhesion pre/cleaner (Stock #703). Then apply Fusor 800DTM/803DTM sealer/adhesive.
How do you tool Fusor 800DTM and 803DTM Direct To Metal Seam Sealer/Adhesive?
If tooling, use the reducer from your paint system. Avoid using other solvents or water as this may inhibit the curing characteristics or performance of the product.
When can you paint Fusor 800DTM and 803DTM Direct To Metal Seam Sealer/Adhesive?
Prime and paint immediately or within 30 days on dirt and dust-free surface. If after 30 days, scuff lightly.
When can I paint Fusor urethane Seam Sealers?
Paint per manufacturer's recommendations immediately or within 30 days (scuff lightly).
What Fusor product can I use for Roof Ditch and Drip Rail Seam Sealing?
Use Fusor 122EZ Self-Leveling Seam Sealer for Roof Ditch and Drip Rail Seam Sealing. Here are some tips for successful sealing:
- Use one 300 ml cartridge per seam. Do not change cartridges in the middle of the seam.
- When inserting the cartridge in the dispensing gun, keep the gun pointed upward.
- When attaching the mixing tip, make sure the attaching nut is tight. This will prevent air from being sucked in and creating bubbles. Never cut off the mixing tip as it provides the correct back pressure for correct flow.
- When filling the channel, keep the flow as continuous as possible.
- Remove any visible air bubbles in the seam immediately after application by using a pin, pick or razor to pop each bubble individually.
- For complete instructions, please consult Fusor Repair Procedure for Drip Rail and Roof Ditch Seam Sealing.
Fusor Sprayable Seam Sealer FAQs
Can you provide application instructions for Fusor HD Sprayable Seam Sealers?
Following are best practices for applying Fusor HD Sprayable Seam Sealers:
- Ensure the gun tip and nozzle are free of debris prior to spray application.
- Completely remove cartridge foil from the barrel bottom.
- Cut off the cartridge nipple at the extreme edge allowing most of the threads to be visible.
- Purge out any air prior to spraying by pushing in cartridge piston by hand until some product comes out.
- Tighten the gun barrel collars securely on both ends after cartridge insertion to prevent air leakage and spattering.
- Air pressures set between 25-40 psi (0.17-0.28 MPa) at the wall work best.
- Practice sprayable bead patterns before applying by spraying out on a scrap panel or cardboard.
- Start by adjusting the air control valve wheel from closed to slightly open, and then adjust as desired. The fluid control can be adjusted for more product flow.
- To change a cartridge that has not been completely emptied, unscrew both collars and remove the barrel, and then slip the cartridge out of the barrel. Doing this eliminates the possibility of seam sealer leakage and prevents a mess inside the barrel.
What can I trouble shoot when I have problems with Sprayable Seam Sealers?
Following are some best practices for successful applications of Fusor HD sprayable seam sealers:
- Solvents should not be used, as they can be absorbed into the sealers and may product unsatisfactory results when painted due to incompatibility with paint products.
- Do not leave the gun open/apart between uses unless the gun's fluid tube and spray nozzle are completely clean. A clogged fluid tube is difficult to clean.
- Do not spray at high air pressure levels, as simple textured areas are hard to control. Air pressures settings between 25-40 psi (0.17-0.28 MPa) work best. In addition. High pressures can increase spitting/ popping during application.
- Do not drill a hole in the bottom of the cartridge before using. Push the cartridge plunger inwards for proper purging of product.
- Only apply sealer recoats wet on wet. Cured seam sealers will resist recoats.
How can I create textured seams and beads with HD sprayable seam sealers?
Following are instructions and settings recommended for Fusor HD sprayable Seam Sealers:
- To apply a textured wheelhouse pattern or stone guard look, turn the airflow and hand-wheel counter clockwise approximately ½ turn and spray from a distance of 4-6 inches (10-15 cm) as desired. The fluid control works well at about seven turns. Adjust the air pressure at the line to 25 psi (o.17 MPa) for a narrow fan pattern and up to 40 psi (0.28MPa) for a wider spray pattern. Adjust hand wheel as desired.
- For common floor seams, turn the airflow hand wheel counter clockwise approximately ¼ turn and spray from from a distance of ½-1 inch (1.302.5cm). Adjust air pressure at the line to 40 psi (0.28 MPa) and set the fluid control knob to about seven turn. Adjust hand-wheel as desired. Note: These are beginning settings - adjustment will be needed in your specific application.
- Watch our video.
What are storage and cleaning instructions for the Fusor 312 sprayable seam sealer gun?
Following are best practices to store and clean the Fusor 312 Spray Gun:
- Turn air control wheel to closed position when done spraying.
- Store partially used cartridge inside gun to ensure airtight seal. This prevents sealer from curing in fluid tube of gun.
- If storage time is more than two weeks, remove the cartridge and clean the gun.
- Simple maintenance consisting of cleaning the spray tip; spray nozzle and gun barrel with the reducer from your paint system is usually all that is required.
Fusor Weld Sealing FAQs
Is the material protruding from the pinch weld area soft, pliable or appears to be foam?
If so, this is weld sealing and proceed with the Standard Operating Procedures for Weld Sealing using Fusor HD Seam Sealers.
Download SOP (standard operating procedure)
When should mig-welding be used for Fusor HD and what is the process?
Mig welding can be used when STRSW (Squeeze Type Resistance Spot Welding) reach is limited. The process is as follows:
- Apply HD Seam Sealer leaving 1" of bare metal on all sides of the mig-weld location.
- Mate parts
- Mig weld
Can you mig-weld using Fusor HD on laminated steel?
Mig-welding cannot be used on laminated steel. This is an STRSW (Squeeze Type Resistance Spot Welding) application only.
Fusor Bonding FAQs
What are application instructions for Fusor 108B/109B, 110B/111B, 112B/113B Acrylic Metal Bonding Adhesives?
Following are best practices for metal bonding with Fusor Adhesives:
- Grind the surface of all mating flanges (not greater than 1 inch (25.4mm) to which LORD Fusor metal bonding adhesive will be applied.
- Make sure to remove any adhesive, e-coating, corrosion protection or galvanized coating. If metal has a pewter appearance, then not all of the galvanized coating has been removed.
- The metal should be shiny in appearance.
- Prefit the panel to ensure proper alignment.
- After the adhesive is applied to mating surfaces and panels are properly positioned, clamp the panels tight. Glass beads in the adhesive will prevent over clamping.
- When bonding sectioning joints with the overlap technique, remove all excess adhesive from the sectioned area. Check the sectioned area for a smooth transition to prevent ghost-lines after painting. Skim coat the section seam with a fiber-filled body filler, rough sand, and blend with conventional body filler.
- Wait 8 hours before painting and baking.
What do I do when the adhesive still feels tacky or sticky on the surface but cured hard underneath the outer layer?
This is a normal property of the adhesive and does not indicate a problem with the adhesive cure. The tacky layer can be removed with a solvent wipe or by grinding. The surface can be tackier in summer months.
What is the recommended application method for Fusor 208B?
Fusor 208B should be applied with the "buttering" method. Apply a small amount of adhesive to the bonding flange of both panels. Quickly spread adhesive over all bare metal as a priming operation. This technique improves strength and ensures coverage of all bare metal flanges.
Can Fusor 208B be painted immediately after bonding?
Yes. Fusor 208B may be painted immediately with a full paint system. Follow paint manufacturer's recommendations and check paint system compatibility before proceeding.
Fusor Weld Bonding FAQs
Can I do weld bonding with Fusor adhesives?
Yes. Weld bonding is a method of joining metals which involves Squeeze Type Resistance Spot Welding (STRSW) used in conjunction/combination with a structural adhesive.
When can I weld after I have applied Fusor adhesives?
You may begin welding immediately, any time during the adhesive cure process and/or when the adhesive is fully cured. Welder settings will vary when welding through wet vs. cured adhesive.
What sections of the car or truck are typically weld bonded?
Typical weld bonded procedures include: Quarter panels, rear body panels, decklids, hoods and roof panels.
What are some tips for successful weld bonding?
Following are best practices for weld bonding with Fusor adhesives:
- Using two pieces of scrap metal from the damaged part, build a test sample.
- To ensure welder conductivity, place a shunt weld in an area with no adhesive as the first weld or use shunt pliers during the welding process.
- Please the sample in a bench vice and perform a destructive weld test.
- Measure weld nugget to determine that it meets OEM weld nugget size requirements for the metal thickness that you are working with. For example, some OEM manufacturers recommend that the weld nugget size should be at least 0.185 inch (4.7 mm) or greater when welding two 0.04 inch )1.0 mm) metal panels.
What are some of the repair procedures for weld bonding?
Fusor has the following resources available for Weld Bonding:
Should Fusor 208B be welded when wet or cured?
It is best to weld Fusor 208B wet. However, Fusor 208B can be welded through after it is cured if necessary.
Fusor Rivet Bonding FAQs
Can I do rivet bonding with Fusor adhesives?
Yes. Rivet bonding is a method of joining metals which involves the installation of structural rivets used in conjunction/combination with a structural adhesive.
Where do you usually use rivet bonding on a car or truck?
Please consult the OEM Repair Manual or Technical Service Bulletin for vehicle specific repair information. Rivet bonding can be used for repairs or replacements of secondary, non-structural or structural body panels and/or patch panels.
What Fusor adhesives are used in rivet bonding?
LORD Fusor 108B/109B and 112B/113B metal bonding adhesives are recommended to use for rivet bonding structural and non-structural body panels, depending on temperature and work time needed. Fusor 108B metal bonding adhesive is approved by Ford Motor Company for repairs on the 2015 Ford F-150 military-grade aluminum alloy cab by their dealers and independent body shops.
Can I use Fusor 108B for Ford F-150 Aluminum Cab Repair?
Yes. Ford Motor Company approved LORD Fusor 108B metal bonding adhesive for repairs on the 2015 Ford F-150 military-grade aluminum alloy cab by their dealers and independent body shops.
Fusor Automotive Repair Dispensing Applicators & Accessories
Can you provide steps to prepare the Fusor 301 Manual Dispensing Applicator?
Lord Fusor 301 Manual Dispensing gun can be used with either a 1:1 ratio 300ml cartridge or 2:1 ratio 225ml cartridge.
- Make sure the appropriate push pads are installed on the manual dispensing gun
- Align push pads by making sure that arrows on push pads are pointing towards each other
- Remove the retaining nut and plugs from end of the cartridge
- Insert the cartridge into the manual dispensing gun
- Level the plungers by applying pressure to the gun until both sides of the material flow through the openings in the cartridge.
- Attach the mix tip:
- Apply pressure to the gun forcing the material through the mix tip
- Run out a mixer's length of adhesive on scrap material to ensure a complete mix.
What are storage and cleaning instructions for the Fusor 312 sprayable seam sealer applicator?
Following are best practices to store and clean the Fusor 312 Spray Gun:
- Turn air control wheel to closed position when done spraying.
- Store partially used cartridge inside gun to ensure airtight seal. This prevents sealer from curing in fluid tube of gun.
- If storage time is more than two weeks, remove the cartridge and clean the gun.
- Simple maintenance consisting of cleaning the spray tip; spray nozzle and gun barrel with the reducer from your paint system is usually all that is required.
Fusor 2098 Crash Durable Adhesive FAQ
What is the best way to prepare the Fusor 2098 cartridge prior to use?
For best results:
- Insert the coaxial cartridge into the #313 (manual) or #314 (pneumatic) rod driven dispensing gun. Pneumatic, non rod driven , 1K caulking guns should not be used. Cordless, battery powered, rod driven applicators are acceptable as well.
- Remove cap and plugs and level the plungers by applying pressure to the gun until both sides of the material flow through the openings in the cartridge
- Attach the mix tip
- Apply pressure to the gun forcing the material through the mix tip
- Run out a mixer's length of adhesive on scrap material to ensure a complete mix
How do you store partially used cartridges of Fusor 2098 Adhesive?
Store the cartridge with the mix tip on. The Mix tip will serve as a cap to keep material fresh. NOTE: When replacing the mix tip prior to the next use inspect the cartridge openings for any partially cured adhesive and remove.
For how long is the mixing nozzle good?
If material has been in the mixing tube for longer than a half hour it should be replaced before applying adhesive to make a repair.
To what surfaces will Fusor 2098 bond?
Fusor 2098 will bond to uncoated steel, electro galvanized steel (EGS), galvanized, e-coated steel, aluminum, fiber reinforced plastic (FRP) and sheet molded compound (SMC).
What does "crash durable" really imply?
Fusor 2098 is not just strong, but tough. The tensile strength of the adhesive is similar to other high-quality aftermarket adhesives but when put into a peeling situation the toughness shows. Impact wedge peel, or IWP, is the measurement which illustrates this and Fusor 2098 provides 30N/mm (30 Newton millimeters) where most adhesives are in the 5-6 N/mm range. This is a tremendous increase and why it is so "tough". This toughness is why it is so crucial to replace all OE applied crash durable adhesives with Fusor 2098.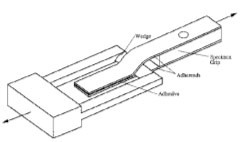
Can the product be cured at a higher temperature for a faster cure than 2 hours at 140 F°?
No, the increased heat will negatively affect the adhesive.
Once a vehicle is repaired and it comes back for another repair on the same panel how is 2098 separated?
The 2098 bond removal is really no different than any other adhesive. Where a 2-T (2 "thicknesses" or layers of metal) overlap exists, use an electric heat gun to slightly soften the adhesive and then use a chisel action to break the adhesive bond. When a 3T or 4T panel overlap exists it is recommended to perform the removal cold as heat input could damage adhesive between the other layers. Make sure to remove all old adhesive before installing the new panel and always check with the vehicle manufacturer for their position on use of heat.
Can 2098 be used with any other type of welding other than STRSW and if so what are the recommended procedures?
When allowed by an OEM, MIG welding and MIG brazing may be utilized but the adhesive must be held back an inch to minimize any weld contamination or burning of the adhesive.
Can the product be used to any type of structural bonding ex. radiator supports, inner wheel house?
Always follow manufactures repair guidelines for proper methods. Where no guidelines exist, duplicate the original OEM build process.
Can Fusor 2098 be used for any type of cross-bonding?
Since Fusor 2098 bonds well to steels, aluminum, and fiber reinforced plastic (FRP) cross-bonding is an option, but always follow OEM recommendations where they exist.
Can squeeze out be painted over?
Fusor 2098 adhesive squeeze out can be painted after 48 hours room temperature cure or 2 hours of 140F° accelerated cure. To improve cycle time it is recommended to simply remove all squeeze out, wipe any adhesive residue from the surface using a solvent, and then apply a 2K sealer.
Why is there a new step using the adhesive to prime, or "butter", the bonding surface before applying the adhesive bead?
While Fusor 2098 has excellent "wet out", which is a term to describe the wet adhesive grabbing onto the substrate, testing has shown a significant bond improvement overall when very fresh adhesive is applied to the surface.
When is the optimum time span for welding after dispensing Fusor 2098?
- Immediately - it may be welded immediately as there are no flammable vapors to flash off.
- 1-hour - while not critical, it is best practice to fully lock down the adhesive via the welding while in the work time window - after the hour point the STRSW will weld through the adhesive, but the ability to pull a tight bond line changes as the material may begin to harden.
Can solvents be used in surface preparation before applying Fusor 2098?
Yes. After grinding all mating surfaces with 80-grit (or finer) disk, wipe bonding surface with solvent (acetone, heptanes, isopropyl alcohol, MEK, etc.), leaving no residue.